Minimaps Research
I am Alejandro Gamarra Niño, student of the Bachelor’s Degree in Video Games by UPC at CITM. This content is generated for the second year’s subject Project 2, under supervision of lecturer Ricard Pillosu.
Theory about minimaps
What is a minimap?
Minimap is an UI element of the HUD usually located in a corner of the screen. It shows an abstract view of the playfield where the gameplay is being played on a smaller scale. Its main objective is to help the player orientate and help them successfully navigate the environment to reach points of interest and objectives.
When is a minimap necessary? / Introduction to the problem
This question has a different answer depending on the genre and the pillars of the video game but in general the main problems that make the minimap a necessity are:
- The playfield is large
- There are multiple ways to reach the same destination (No linear game)
- There are lots of different points of interest
- You need to know the position of allied and enemy units
- The game requires macro management ( RTS )
In order to solve these problems one of the several options is to implement a minimap. Other options are in-game elements like arrows or the famous compas buts this elements are not compatible with most genres.
Minimap types / Different approaches
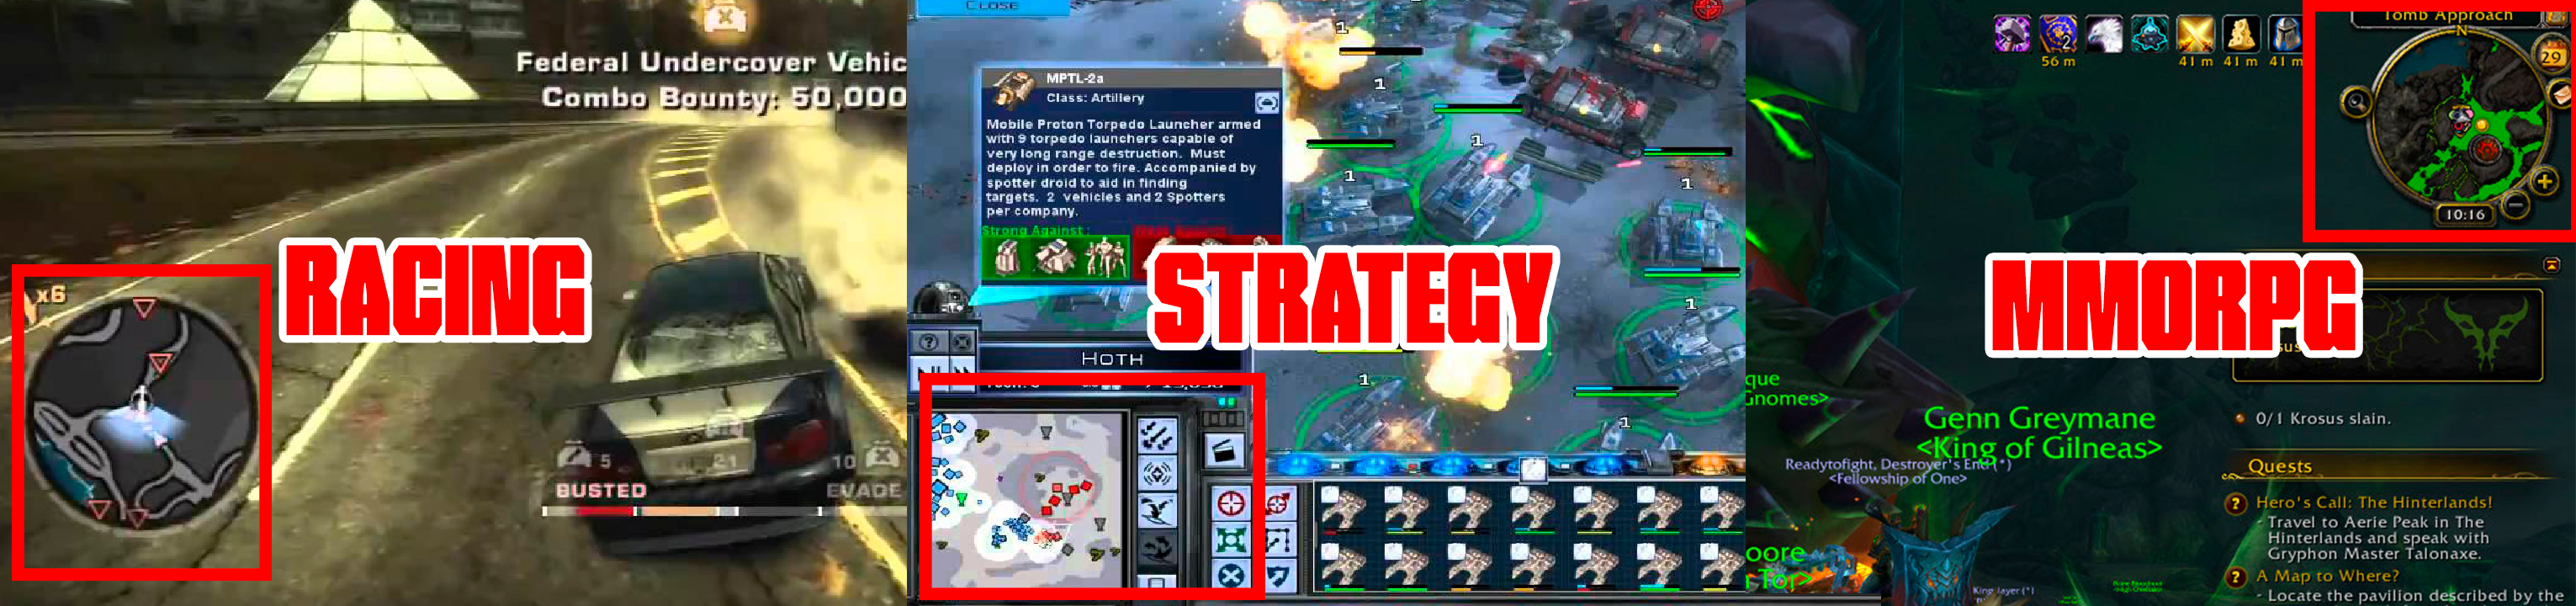
Mini maps can be classified by many of their attributes as their perspective (Orthogonal, Isometric, 3D) or their shape (Rectangular, Circular) but the two most common types are:
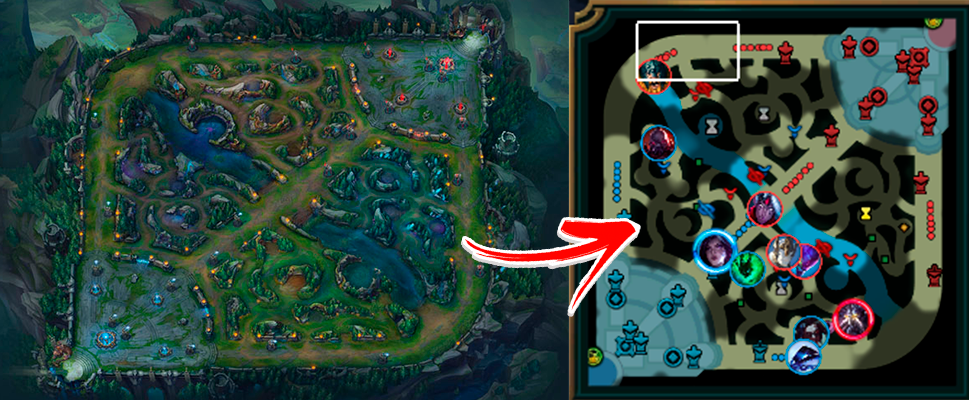
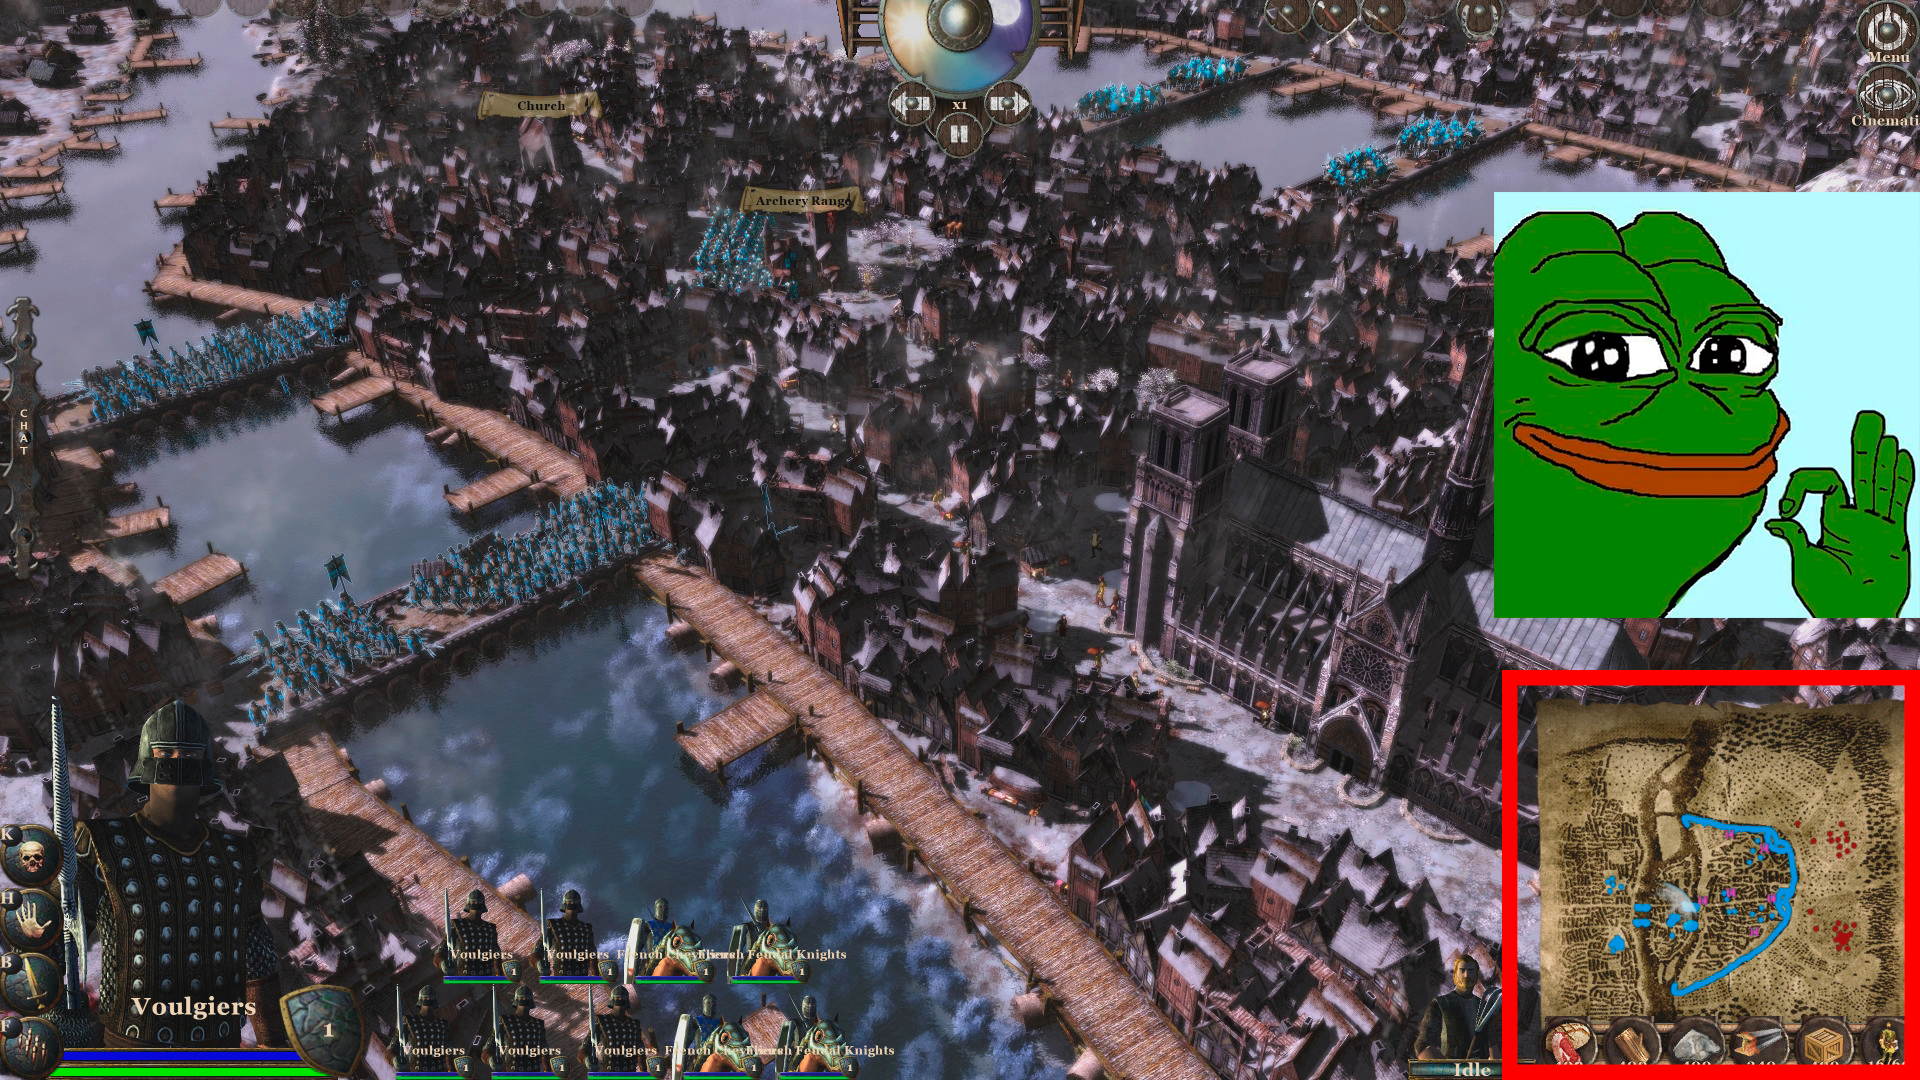
- Whole world: This mini map type functions as a miniaturized world map. We can see them in Sports, Racing ,MOBA or Strategy games. In some cases they have a rectangle representing the area of the camera with which you can interact by dragging the mouse.

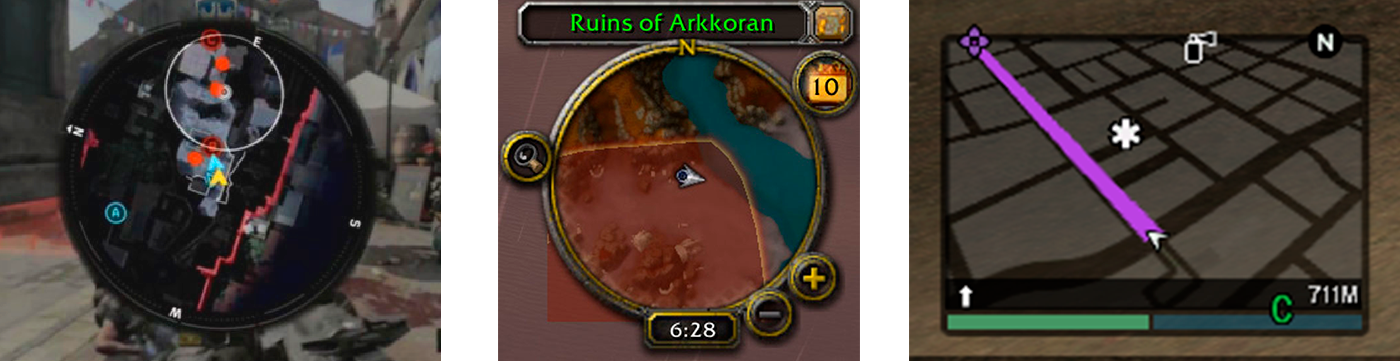
- Focused on the player: The scope of the mini maps in Action, Shooter and Role-playing games displays only a limited field of view including your immediate surroundings (or your current sector).
Features
- Limits & barriers
- Player/s, enemies & allied position
- Points of interest with icons: Checkpoints, domination points, buildings, save points, traders, etc;
- Labels: Can be attached to points of interest or only indicate the name of an area,
- Peripheral arrows: When a point of interest is not in the scope an arrow points in the direction where it is surrounding the edges of the minimap.
- Rotation: When a minimap is focused on player it can rotate according to the angle of the axis that represents the height (y or z normally)
- Automap: Like the game The Binding of Isaac, the minimap is automatically generated next to the generation of rooms
Interactions
- Navigation: Move to a position by one click and/or drawing the path (Strategy & MOBA games).
- Alerts: (also called Pings) like Target or Retreat (especially in multiplayer games)
- Tooltips Keeping the cursor on some element in the mini-map opens a panel with more information
- Zoom Usually this interaction is accompanied by two buttons plus and minus zoom or a slider
- Mouse drag: Change the map segment using mouse drag.
- Change rotation mode: It allows to iterate between fixed map in the north or rotation
Where should we place the minimap? / Different approaches
You may be thinking, does the position of the minimap matter? The truth is that yes, it affects above all in fast-paced games such as First Person Shooters where you usually put the minimap on the left. This is because our western culture tends to pay more attention to the left part of the screen.
A misplaced minimap can not only lead to prolonged reaction times but also to erroneous clicks and misperceptions (depending on where you place other HUD elements). Therefore it is not uncommon to find that the same game released in the West has the minimap or other elements of HUD different position than in the East. Ideally, we would give the possibility to configure its position and size to make the game more accessible for everyone.
As we can verify each video game genre has a distinctive position on the screen:
- MOBA games place the mini map exclusively at the bottom.
- Strategy games use mostly the bottom left but most RTS use top right. .
- MMORPG’s games place exclusively at the right and mostly at the top.
- Racing games use predominantly the bottom like GPS’s.
- FPS games use also mainly the left for placing the mini map.
Selected approach
After seeing the theory, let’s start with the practical part. I’m going to teach you how to program an isometric mini-map from 0 using only SDL with a renderer initialized with Opengles2 . The final result will be a mini-map that can:
- Switch between Focused on Player or Whole world.
- Switch its shape between rectangular or circular.
- Create indicators with icons such as points of interest, positIons & warnings by clicking over the minimap or world.
- Move the camera using the mouse drag.
Here you can see the final result:
So, we have two classes that will contain everything we need:
- The first is
class Minimapthat will serve as the factory for the instances ofclass Minimap_Indicator - The second one is
class Minimap_Indicatorthat will serve as an infromation container for warnings and positions.
Class Minimap Lifecycle

Class Minimap Indicators Lifecycle
Leaving the textures aside, we first need to integrate the indicators. These have a life cycle that only consists of a Constructor, an Update and a Destroy. These can use either a target to update their position or stay at a fixed point. Your position is in map coordinates. This class is a class Minimap friend since it only will treat its private variables.
class Minimap_Indicator
{
public:

	Minimap_Indicator(const fPoint map_pos, const SDL_Rect icon_rect = { 0,0,0,0 }, const SDL_Color color = { 0,0,0,0 }, Object*  target = nullptr);

	void Destroy();

private:

	bool UpdateFromTargetPosition();

private:

	fPoint     map_pos = { 0, 0 };        // - Map position in map units
	SDL_Rect   icon_rect = { 0,0,0,0 };   // - Icon sprite rect , {0,0,0,0} = No icon
	SDL_Color  color = { 0,0,0,0 };       // - Point color, {0,0,0,0} = No point
	Object*    target = nullptr;          // - Target used to update map_pos, nullptr = static map_pos
	bool       to_destroy = false;        // - Indicator used to known when is ready to be destroied

private:

	friend Minimap;
};
Load Minimap Info
The first step is to generate the necessary information for the subsequent generation of the texture. In order not to distort the image, we will generate the texture from the width value. The information we have from the map will be obtained from a map daata already loaded in the Map module (class M_Map m_map on app). This is the responsibility of the LoadMinimapInfo() method.
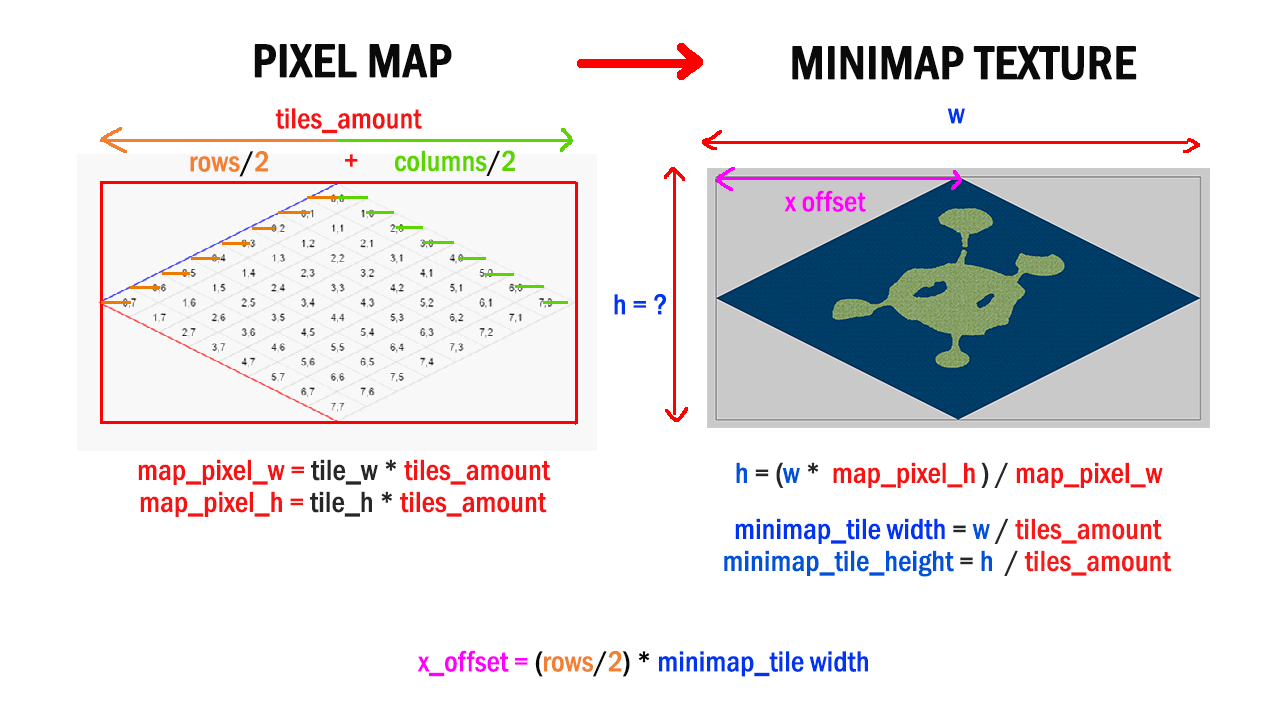
- We need to know
x_offsetsince the 0.0 of the minimap texture does not match the 0.0 of the represented map. apect_ratio_xandapect_ratio_yare constants that directly relate the dimensions in pixels of the map with the size of our texture
bool Minimap::LoadMinimapInfo()
{
	if (app->map->MapLoaded() == false) { return false; }  // If there isn't a map loaded break load

	// Information from map data ==================================================================

	float tile_width = app->map->data.tile_width;
	float tile_height = app->map->data.tile_height;
	float half_tile_width = (float)app->map->data.tile_width * 0.5f;
	float half_tile_height = (float)app->map->data.tile_height * 0.5f;

	// Number of tiles that fit on one side of the map =============================================

	float tiles_amount = (float)(app->map->data.columns + app->map->data.rows)* 0.5f;

	// Map Pixel Mesures ==========================================================================

	float map_width = tile_width * tiles_amount;
	float map_height = tile_height * tiles_amount;

	// We found texture height from the width with a rule of 3  ===================================

	texture_height = (texture_width * map_height) / map_width;

	// Now we have enough information to know the size of minimap tiles ===========================

	minimap_tile_width = texture_width / tiles_amount;
	minimap_tile_height = texture_height / tiles_amount;

	// We also find a constant to transform from pixels in the world to pixels in the minimap  ====

	aspect_ratio_x = texture_width / map_width;
	aspect_ratio_y = texture_height / map_height;

	// Finally, the blit x offset ===============================================================

	x_offset = (float)app->map->data.rows *minimap_tile_width * 0.5f;

	return true;
}
Unit transformation methods
These functions are the core of our class. They allow us to transform units and thus be able to interact between the map and the minimap with its respective offset x_offset. These formulas are related to the isometric world. You can get more information about isometric maps in this link.
- Map Coordinates to Minimap Pixels Coordinate
fPoint Minimap::MapToMinimap(const float x, const float y) { return fPoint((x - y) * minimap_tile_width * 0.5f + x_offset, (x + y) * minimap_tile_height * 0.5f); } - Minimap Pixel Coordinate to Map Coordinates
fPoint Minimap::MinimapToMap(const float x, const float y) { float half_width = minimap_tile_width * .5f; float half_height = minimap_tile_height * .5f; float x_mod = x - x_offset; return fPoint( (x_mod / half_width + y / half_height) * .5f, (y / half_height - x_mod / half_width) * .5f); } - World Pixels Coordinates to Minimap Pixels Coordinate
fPoint Minimap::WorldToMinimap(const float x, const float y) { return fPoint(x * aspect_ratio_x + x_offset, y * aspect_ratio_y); } - Minimap Pixels Coordinate to World Pixels Coordinates
fPoint Minimap::MinimapToWorld(const float x, const float y)
{
  return fPoint((x - x_offset) / aspect_ratio_x,  y/ aspect_ratio_y);
}
Generate Minimap Texture
Once we have the transformation methods of units we can generate the texture of the minimap. To do this, iterate throught all the layers tiles and draw a tileset tile sprite in a scaled size corresponding to the width and height of minimap tiles. This is the responsibility of the GenerateMinimapTexture() method.
This method creates the final texture and the minimap texture. These textures will be used later in the drawing of the minimap. What you have to keep in mind is that we change the SDL_Render target in order to draw in a texture (in this case minimap_texture) instead of the default texture that is the texture that the SDL_Window has internally. For more information on this topic I leave the SDL_SetRenderTarget () API.
bool Minimap::GenerateMinimapTexture()
{
// Create Target Textures ====================================
final_texture = app->tex->CreateTargetTexture(minimap_rect.w, minimap_rect.h);
minimap_texture = app->tex->CreateTargetTexture(texture_width, texture_height);
SDL_SetRenderTarget(app->render->renderer, minimap_texture);
SDL_SetTextureBlendMode(minimap_texture, SDL_BLENDMODE_BLEND);
// Blit scaled map to minimap texture =========================
SDL_Rect sprite_rect = { 0,0,0,0 };
SDL_Rect section_to_print = { 0,0,0,0 };
fPoint minimap_tile_pos = { 0,0 };
for (std::list<MapLayer*>::iterator iter = app->map->data.map_layers.begin(); iter != app->map->data.map_layers.end(); ++iter)
{
for (int y = 0; y < (*iter)->rows; ++y)
{
for (int x = 0; x < (*iter)->columns; ++x)
{
Tileset* tileset = app->map->GetTilesetFromTileId((*iter)->Get(x, y));
sprite_rect = tileset->GetTileRect((*iter)->Get(x, y));
minimap_tile_pos = MapToMinimap(x, y);
if (minimap_tile_width > 1.f && minimap_tile_height > 1.f)
{
section_to_print = { (int)minimap_tile_pos.x, (int)minimap_tile_pos.y, (int)minimap_tile_width, (int)minimap_tile_height };
}
else
{
section_to_print = { (int)minimap_tile_pos.x, (int)minimap_tile_pos.y, 1, 1 };
}
SDL_RenderCopy(app->render->renderer, tileset->texture, &sprite_rect, §ion_to_print);
}
}
}
// Reset target texture ==================================================
SDL_SetRenderTarget(app->render->renderer, NULL);
return true;
}
Update Final Texture
In UpdateFinalTexture() method we draw all the necessary textures in the final_texture using the render target as we have done before. We will do the drawing in this order ( like photoshop layers ):
- Set
final_textureas render target - Clear texture (erase all and draw a black background)
- Draw
minimap_texture - Draw all icons from
icons_textureor points instead. - Draw camera representation rect
- Draw
alpha_mask_texture
void Minimap::UpdateFinalTexture()
{
// Set render target =========================================================
SDL_SetRenderTarget(app->render->renderer, final_texture);
SDL_SetTextureBlendMode(final_texture, SDL_BLENDMODE_BLEND);
// Clear texture =============================================================
SDL_SetRenderDrawColor(app->render->renderer, 0, 0, 0, 255);
SDL_RenderClear(app->render->renderer);
// Draw minimap texture =====================================================
app->render->BlitUI(minimap_texture, texture_pos.x, texture_pos.y, NULL, camera);
// Draw minimap indicators ==================================================
SDL_Rect section_to_print = { 0,0,0,0 };
fPoint pos = { 0,0 };
for (std::list<Minimap_Indicator*>::iterator iter = indicators_list.begin(); iter != indicators_list.end(); ++iter)
{
pos = texture_pos + MapToMinimap((*iter)->map_pos.x, (*iter)->map_pos.y);
if ((*iter)->icon_rect.w != 0 && (*iter)->icon_rect.h != 0)
{
section_to_print = { (int) (pos.x - (*iter)->icon_rect.w* 0.5f) , (int)(pos.y - (*iter)->icon_rect.h* 0.5f), (*iter)->icon_rect.w, (*iter)->icon_rect.h };
SDL_RenderCopy(app->render->renderer, icons_texture, &(*iter)->icon_rect, §ion_to_print);
}
else
{
section_to_print = { (int)(pos.x - 2), (int) (pos.y - 2), 4, 4 };
app->render->DrawQuad(section_to_print, 255, 0, 0, 255, true, false);
}
}
// Draw minimap camera rect =================================================
pos = texture_pos + WorldToMinimap(camera->camera_pos.x, camera->camera_pos.y) ;
SDL_Rect camera_rect = { pos.x , pos.y, camera->screen_section.w * aspect_ratio_x , camera->screen_section.h * aspect_ratio_y };
app->render->DrawQuad(camera_rect, 255, 255, 255, 255, false, false);
// Draw alpha mask texture =================================================
if (shape_type == SHAPE_TYPE::CIRCLE)
{
SDL_RenderCopy(app->render->renderer, alpha_mask_texture, NULL, NULL);
}
// Reset render target ======================================================
SDL_SetRenderTarget(app->render->renderer, NULL);
}
As you can see, we draw an alpha mask. This is possible thanks to the custom blend mode that has the texture. This blend mode is achieved using the SDL_ComposeCustomBlendMode function. The blend mode that alpha masks need is only available with render that certain drivers like OpenGLES 2.0 or DirectX11 use. In our case, we will use OpenGL ES 2.0, which is already integrated with SDL 2.0. To be able to use it we must:
- Attach
SDL_WINDOW_OPENGLflag - Set all the necessary attributes to work in a OpenGL context.
- Create the SDL_Window
Uint32 flags = SDL_WINDOW_SHOWN;
flags |= SDL_WINDOW_OPENGL;
SDL_GL_SetAttribute(SDL_GL_CONTEXT_PROFILE_MASK, SDL_GL_CONTEXT_PROFILE_ES);
SDL_GL_SetAttribute(SDL_GL_CONTEXT_MAJOR_VERSION, 2);
SDL_GL_SetAttribute(SDL_GL_CONTEXT_MINOR_VERSION, 0);
SDL_GL_SetAttribute(SDL_GL_DOUBLEBUFFER, 1);
SDL_GL_SetAttribute(SDL_GL_DEPTH_SIZE, 24);
window = SDL_CreateWindow(app->GetTitle(), SDL_WINDOWPOS_UNDEFINED, SDL_WINDOWPOS_UNDEFINED, width, height, flags);
- Identify the “opengles2” driver
- Create the SDL_Render ```cpp SDL_RendererInfo info; int index = -1;
for (int i = 0; i < SDL_GetNumRenderDrivers(); ++i) { SDL_GetRenderDriverInfo(i, &info);
if (info.name == std::string("opengles2"))
{
	index = i;
} } renderer = SDL_CreateRenderer(app->win->window, index, flags); ```
- Finally, we can create the
SDL_BelndModeand set it in ouralpha_mask_texture
SDL_BlendMode blend_mode = SDL_ComposeCustomBlendMode(SDL_BLENDFACTOR_ZERO, SDL_BLENDFACTOR_ONE, SDL_BLENDOPERATION_ADD, SDL_BLENDFACTOR_ONE, SDL_BLENDFACTOR_ONE, SDL_BLENDOPERATION_REV_SUBTRACT);
SDL_SetTextureBlendMode(alpha_mask_texture, blend_mode); // This belnd mode become transaparent all pixels under the painted area of texture
Links to more Documentation
- Where Should We Place the Mini-Map? ( Gamasutra Blog )
- Video Game Mini-Maps Might Finally Be Going Away ( Kotaku Article )
- Horizontal Atention Leans Left ( Nielsen Norman Group Article )
- Mini-Map by Jack Davies ( Game UI Patterns Article )
- Creating Isometric Worlds (gamedevelopment)
- Game Design Affect Minimap Design - Black Ops 4 Minimap ( Dexerto Article )
- Following the Little Dotted Line ( Video )
TODO’S & Solutions
TODO 1: Complete MapToMinimap()
Explication
Transform Map Coordinates to Minimap Pixel Coordinates. Very similar to the MapToWorldF() function on M_Map.
Test
The texture of the minimap will be well generated and you will be able to see it but it will be static. You will also see the position indicator of the player and you can even add alerts by clicking on the map.
Solution
fPoint Minimap::MapToMinimap(const float x, const float y)
{
	return fPoint((x - y) * minimap_tile_width * 0.5f + x_offset, (x + y) * minimap_tile_height * 0.5f);
}
TODO 2: Complete MinimapToMap()
Explication
Knowing how to transform Map coordinates to Minimap Coordinates, complete the inverse function.
Solution
fPoint Minimap::MinimapToMap(const float x, const float y)
{
	float half_width = minimap_tile_width * .5f;
	float half_height = minimap_tile_height * .5f;

	float x_mod = x - x_offset;

	return fPoint((x_mod / half_width + y / half_height) * .5f, (y / half_height - x_mod / half_width) * .5f);
}
TODO 3: Add an alert (Ping) by clicking over minimap
Explication
When you right click on the minimap, you must add an alert. Use the AddIndicator () function & GetTextureScreenPos() function. The alert sprite sheet rectangle is {32, 32, 32, 32}.
Test TODO 2&3
You can add indicators directly on the minimap with the right click like this:
Solution
if (app->input->GetMouseButton(3) == KEY_DOWN)
{
	if (SDL_PointInRect(&mouse_point, &minimap_rect))
	{
		AddIndicator(MinimapToMap(mouse_point.x - GetTextureScreenPos().x, mouse_point.y - GetTextureScreenPos().y), { 32, 32, 32, 32 });
	}
	else
	{
		AddIndicator(app->map->ScreenToMapF(mouse_point.x + camera->rect.x, mouse_point.y + camera->rect.y), { 32, 32, 32, 32 });
	}
}
TODO 4: Transform the Minimap into a Focused on Player Minimap.
Explication
When interaction_type == NO_TYPE, update the variable texture_pos so that the player stays in the center of the minimap as in the “Focused on the Player” minimap type. The pointer that contains the player is target_to_follow.
Test
You will see the player focused on the minimap and the texture will move:
Solution
switch (interaction_type)
	{
	case INTERACTION_TYPE::NO_TYPE:
         // here
        texture_pos = fPoint(minimap_rect.w * .5f, minimap_rect.h * .5f) - MapToMinimap(target_to_follow->map_pos.x, target_to_follow->map_pos.y);
		camera_target_pos = camera->camera_pos;
		camera->MoveToObject(dt, target_to_follow);         // Caemra movement ----------
		break;

	case INTERACTION_TYPE::MOUSE_DRAG:

		MouseDragInput(dt);
		camera->MoveToScreenPoint(dt, camera_target_pos);	// Caemra movement ----------

		break;
	}
TODO 5: Draw Camera Area Borders & Apply Alpha Mask
Explication
Within UpdateFinalTexture() you must find the correct location to draw the camera area borders on minimap.
Also placed correctly the alpha mask drawing.
- To draw the camera, use app-> render-> DrawQuad() , the
fPoint
camera->camera_pos
(current position of the camera in the world) ,camera->screen_section.w&camera->screen_section.h - To draw alpha mask use SDL_RenderCopy
Test
You will see that your minimap now has a circular shape! Oh, and the rectangle of the camera will also have appeared. You can use debug mode F1 and F2 without any problem.
Solution
// After minimap indicators
// Draw minimap camera rect =================================================

	pos = texture_pos + WorldToMinimap(camera->camera_pos.x, camera->camera_pos.y) ;

	SDL_Rect camera_rect = { pos.x , pos.y, camera->screen_section.w * aspect_ratio_x ,  camera->screen_section.h * aspect_ratio_y };
	app->render->DrawQuad(camera_rect, 255, 255, 255, 255, false, false);

	// Draw alpha mask texture  =================================================
	if (shape_type == SHAPE_TYPE::CIRCLE)
	{
		SDL_RenderCopy(app->render->renderer, alpha_mask_texture, NULL, NULL);
	}

	// Reset render target ======================================================

	SDL_SetRenderTarget(app->render->renderer, NULL);
Improvements
- Adapt this class so that it is an element of the UI and can be used in the UI factory
- The included map is small so its drawing does not consume much. With larger maps (as in open worlds) you can implement quadtrees and dictate the texture in chunks
- Add your own class of entities as targets of the minimap or of an indicator.
- Add animations to indicators, labels, etc.